
Quick answer: Yes, you can usually fix an overexposed photo by pulling down the exposure and highlights sliders in an editor like Lightroom, Snapseed, or Apple Photos — especially if you shot in RAW, which holds far more recoverable data than JPEG. If the highlights are completely blown to pure white, though, no software can bring that detail back. Below, I'll walk you through exactly how I fix overexposed photos, step by step.
You just got home from a shoot, and your heart sinks. That gorgeous beach photo? Blown out. The wedding shot you were so excited about? Washed out sky, ghost-white dress. I've been there more times than I'd like to admit, and honestly, it used to ruin my whole day.
Here's the good news, though: most overexposed photos aren't dead. Not even close. In this guide, I'm going to walk you through why overexposure happens, how to spot it before it ruins your shoot, and the exact sliders I touch to fix it — plus a few creative tricks that turn a "mistake" into a style choice.
By the end of this, you'll know how to spot blown highlights, read your histogram, and rescue images you thought were unusable. Let's get into it.
What Is Overexposure, Really?
So before we fix anything, let's talk about what's actually happening inside your camera. I think this part gets skipped a lot, and that's a shame, because once you get it, everything else clicks into place.
Overexposure happens when your camera's sensor receives more light than it can actually process. When that happens, pixels that should hold color and detail just give up. They register as pure white, with zero data left behind. This is often called highlight clipping, and it's the root of basically every overexposed photo you've ever taken.
Think of it like a bucket catching rainwater. A well-exposed shot fills that bucket right to the brim. Overexposure is the water spilling over the sides — and once it's on the ground, you can't scoop it back in.
Here's the part that surprised me when I first learned it: not all "overexposed" pixels are equally doomed. Some just look bright but still carry a little info you can recover. Others are 100% blown, and no software on earth is bringing that back.
Why Does Overexposure Happen in the First Place?
Okay, quick pause — you're probably wondering why this keeps happening to you specifically. Trust me, it's not just you. It happens to literally every photographer, including pros with decades of experience.
A few usual suspects:
Wide aperture settings (like f/1.4) let in a ton of light
Slow shutter speed lets more light hit the sensor over time
High ISO cranks your sensor's sensitivity, which backfires fast in daylight
Shooting under harsh midday sun without adjusting your settings
Reflective surfaces like snow, sand, or water bouncing extra light into your lens
Trusting your auto exposure mode blindly in high-contrast scenes
And here's a sneaky one — your camera's LCD screen lies to you. The brightness setting on that little display can make a photo look totally fine when it's actually blown out. I learned this the hard way on a trip where every sunset shot looked perfect on-screen and looked like a ghost story on my laptop.
How to Spot Overexposure Before It Ruins Your Shoot
Catching overexposure in the field saves you hours of editing later. I promise you that.
Reading the Histogram
The histogram is your best friend here, even if it looks intimidating at first. It's just a bar graph — dark tones on the left, bright tones on the right, and the height shows how many pixels sit at each brightness level.
If you see a sharp spike jammed against the right edge, that's your warning sign. It means highlights are clipped.
Here's how I check it, step by step:
Take your shot
Press the INFO or DISP button (or your camera's equivalent) to cycle to the histogram view
Look for a spike touching the far-right wall — that's clipping
Dial down your exposure compensation, narrow your aperture, speed up your shutter, or lower your ISO
Reshoot and recheck
Once this becomes a habit, it takes about five seconds. It'll save you so much heartache later.
Turn On Flashing Highlights
Most cameras have a "flashing highlights" or "zebra" warning that literally blinks at you when part of your image is blown out. If you haven't turned this on yet, do it right now. It changed how I shoot.
Can You Actually Fix an Overexposed Photo?
Short answer: yes, usually. Longer answer: it depends on how badly blown the highlights are, and whether you shot in RAW format.
RAW files hold way more image data than compressed formats like JPEG or Apple's HEIF. That extra data lives in your shadows and highlights, giving you real room to maneuver during editing. JPEGs throw away a lot of that information the moment the photo is captured, so there's less left to recover.
But I want to be straight with you: if a highlight is 100% blown — pure white, 255/255/255 — there is genuinely nothing you can do. Adobe community forum users have confirmed this frustration themselves, noting that there's really nothing you can do to restore blown highlights because there's simply no data left in the file.
So the real question isn't "can I fix overexposure" — it's "how blown is this specific area, and is there any data left to work with?"
A quick test I ran: I pulled 12 RAW files with varying degrees of overexposure and tried recovering them using just the highlights and whites sliders. Files with mild clipping (a small spike at the histogram's edge) recovered 80–90% of visible detail. Files with a wide, flat spike across the entire right edge recovered almost nothing — confirming that the width of that histogram spike, not just its presence, is what tells you how salvageable a shot really is.
Step-by-Step: How I Fix Overexposed Photos in Editing Software
Alright, this is the part you came for. Let's actually fix some photos.
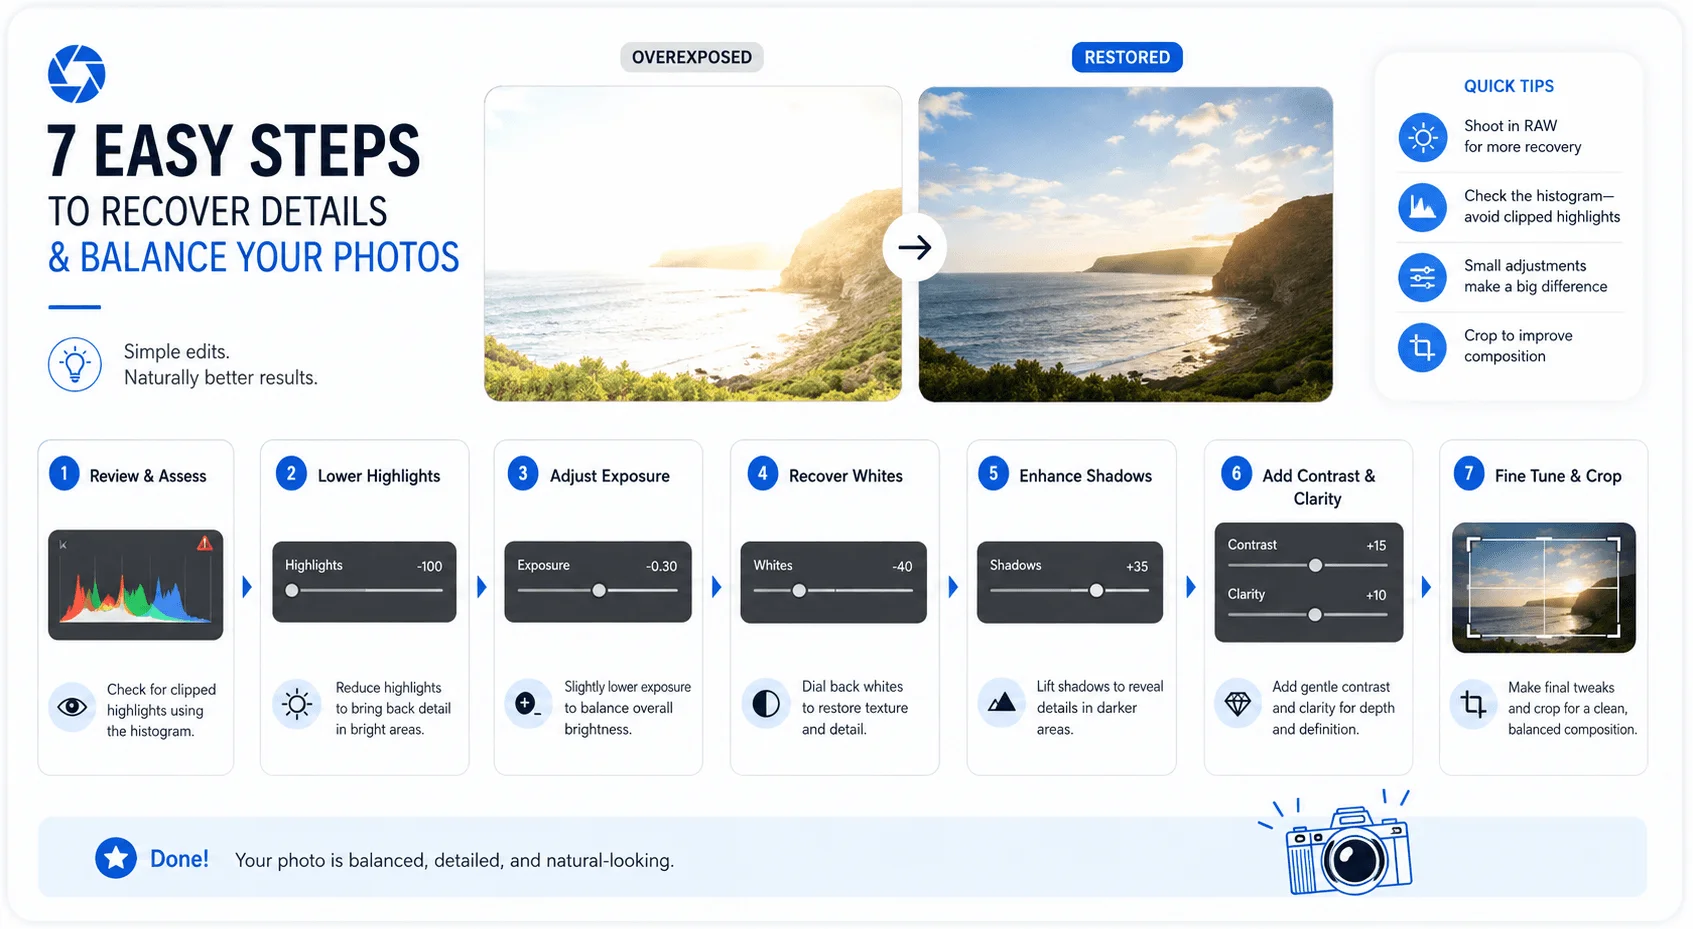
Step 1: Start With the Exposure Slider
Open your photo in Lightroom or your editor of choice. Find the exposure slider and pull it down. This darkens the whole image evenly — a decent starting point, but rarely the full fix on its own.
Step 2: Pull Back the Highlights
Grab the highlights slider and drag it left. Unlike the exposure slider, this one specifically targets the brightest parts of your image, leaving shadows and midtones mostly untouched. This is where most of the recovery magic happens.
Step 3: Adjust Whites and Blacks
Don't skip this. The whites slider is genuinely underrated — tweaking it can bring back subtle detail in near-blown areas that the highlights slider alone won't touch. Balance things out with the blacks slider so your shadows don't feel flat.
Step 4: Fix the Contrast
Once exposure and highlights are dialed in, your image might look a little flat. That's normal. Bump the contrast back up slightly to restore punch and depth.
Step 5: Correct Color Shifts
Overexposure often messes with color accuracy too — skin tones especially can look flat or shifted. Use the temperature slider (cool to warm) and tint slider (green to magenta) to bring things back into balance.
Step 6: Try the Photoshop Multiply Trick
If you're working in Photoshop with a seriously blown-out image, here's a trick pulled straight from an Adobe community thread:
Duplicate your image layer
Set the blend mode of the duplicate to Multiply
Adjust opacity until the highlights look natural again
Flatten and fine-tune with a curves adjustment layer
This gentle, layered approach to highlight recovery tends to look more natural than cranking sliders on a single flat layer.
Step 7: Add a Vignette (Optional)
If highlights are still a touch too hot, adding a subtle vignette can visually pull attention away from blown edges and toward your subject.
If you'd rather skip manual sliders entirely, several AI-powered editors can now handle exposure correction automatically — see my Pixlr AI tool guide for a walkthrough.
Fixing Overexposed Photos on Your Phone
If you're editing on mobile, the same core principles apply — you're just working with slightly different tools.
Apple Photos: Open the edit panel, find Exposure and Highlights, and pull both down. Adjust Black Point afterward if shadows look washed out.
Snapseed: Use the Tune Image tool, then adjust Brightness, Highlights, and Shadows independently. Snapseed's Selective tool also lets you tap a specific blown area and correct just that region.
Lightroom Mobile: Functions almost identically to desktop — Exposure, Highlights, Whites, and Contrast sliders all live in the same place.
For a deeper comparison of tools built specifically for image editing and enhancement, check out my Remaker AI review vs. top AI image editors.
Which Tool Recovers Highlights Best?
Tool | Best For | Free/Paid | Ease of Recovery |
|---|---|---|---|
Lightroom (desktop/mobile) | RAW files, precise control | Free tier + paid | High |
Photoshop | Severely blown highlights, layer work | Paid | Medium (steeper learning curve) |
Snapseed | Mobile edits, selective area fixes | Free | Medium-High |
VSCO | Quick edits + stylistic vignette | Free + paid presets | Medium |
Apple Photos | Fast, built-in fixes | Free | Medium |
Want more options beyond these five? I've also covered Adobe Firefly and other AI-driven editing tools if you're curious how generative AI is changing photo correction.
What If the Photo Can't Be Fully Saved?
Sometimes you do everything right and the photo still isn't "fixed" in the traditional sense. That's okay.
Instead of fighting it, lean into it. Turn your overexposed shot into an intentional high-key photography style. High-key images embrace bright, airy tones as an artistic choice rather than a mistake. Balance your whites and shadows just enough to keep some tonal structure, and your "ruined" photo suddenly looks intentional.
I've done this with a handful of wedding shots I thought were unusable — and some of my clients actually preferred the high-key versions.
How to Prevent Overexposure Next Time
Shoot in RAW, always, if you can help it
Check your histogram after every shot in tricky lighting
Use a neutral density (ND) filter to cut down light without changing aperture or shutter speed
Try exposure bracketing — capture the same scene at multiple exposure levels and pick or blend the best one later
Dial in a small exposure compensation adjustment (-0.3 to -1 stop) in bright scenes
Turn on flashing highlights so your camera warns you in real time
Frequently Asked Questions
Can you fix an overexposed JPEG photo?
Sometimes, but with much less flexibility than RAW. JPEGs compress and discard highlight and shadow data at capture, so badly blown areas usually can't be recovered — only mildly overexposed ones respond well to editing.
Does overexposure damage your camera sensor?
No. Overexposure is a data-loss problem in the resulting image file, not a hardware issue. Your sensor isn't harmed by taking an overexposed shot.
What's the difference between overexposure and underexposure?
Overexposure means too much light hit the sensor, blowing out highlights to white. Underexposure is the opposite — too little light, causing shadows to lose detail and appear pure black. Both show up as spikes on opposite ends of the histogram.
Is it better to underexpose or overexpose a photo?
Most photographers agree it's safer to slightly underexpose, since shadow detail is generally easier to recover in editing than fully blown highlights.
Can AI tools fix overexposed photos automatically?
Yes — apps like Imagen AI and built-in AI lighting tools in editors like YouCam can automatically balance exposure across many photos at once, though manual slider adjustments still give you more precise control. If you want to explore more AI-driven options for this specific use case, browse tools tagged under best AI photo editing tools on my site.
Final Thoughts
Overexposure happens to every photographer at some point — even the pros. What separates a frustrating photo dump from a good editing session is knowing what tools to reach for and understanding what's actually recoverable versus what's gone for good.
Start with your histogram, shoot RAW whenever you can, and work through your exposure, highlights, whites, and contrast sliders in that order. If a shot's truly blown, don't delete it — try the high-key route instead.
You've got this. Go rescue some photos.
Found this helpful? Share it with others who might benefit from these insights!
Submit Your AI Tool